Drywall taping can be a challenging task, especially if you’re not familiar with the right techniques and tips. However, with the help of professionals, you can learn how to speed up your work and achieve flawless results. In this comprehensive guide, we will provide you with all the necessary information to avoid common issues like lumpy mud, nail pops, and tape bubbles. By following these tips and techniques, you’ll be able to achieve a better-looking job every time.
Overview: How to Finish Drywall
Before diving into the taping process, it’s essential to understand the overall process of finishing drywall. By mastering the entire process, from hanging the drywall to sanding the finished surface, you can ensure a smooth and professional-looking result. Let’s take a closer look at each step involved:
1. Drywall Prep
Proper preparation is key to achieving a flawless finish. Before you begin taping, make sure to:
Clean the surface: Remove any debris or dust from the drywall surface using a broom or vacuum cleaner.
Inspect for imperfections: Check for any visible imperfections, such as dents or protruding nails, and address them before proceeding.
Apply a primer: Applying a primer will improve the adhesion of the joint compound and help create a smooth finish.
2. Materials Selection
Choosing the right materials is crucial for achieving professional results. Here are some tips for selecting the appropriate materials:
Joint compound: Opt for a high-quality joint compound that is easy to work with and provides a smooth finish.
Drywall tape: There are different types of drywall tape available, including paper tape and self-adhesive mesh tape. Choose the one that suits your preferences and project requirements.
3. Applying the Tape and Compound
The taping process involves applying tape and multiple coats of joint compound to cover the joints and create a seamless finish. Here’s a step-by-step guide:
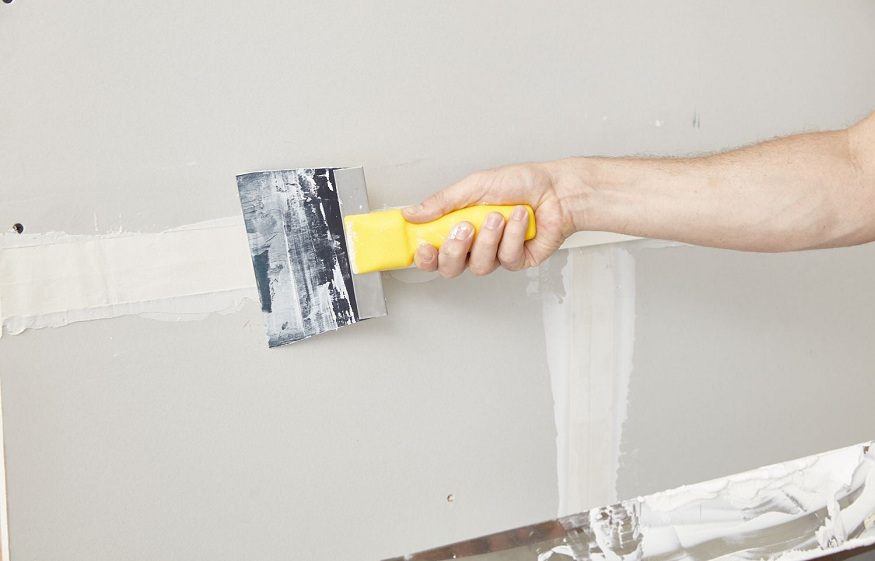
Start with the first coat: Apply a thin layer of joint compound over the joints using a taping knife. Place the tape over the compound and press it firmly into the compound.
Smooth out the tape: Use the taping knife to remove any excess compound and create a smooth surface. Ensure that the tape is firmly embedded in the compound.
Apply subsequent coats: Apply additional coats of joint compound, feathering the edges to create a seamless transition between the compound and the surrounding drywall.
Sand between coats: Lightly sand the compound between coats to remove any imperfections and create a smooth surface for the next coat.
4. Sanding and Finishing
Sanding is an essential step in achieving a professional finish. Follow these guidelines to ensure a smooth and flawless surface:
Use a sanding block or sanding pole: This will help you evenly sand the surface and avoid creating low spots.
Start with coarse-grit sandpaper: Begin sanding with a coarse-grit sandpaper to remove any high spots and imperfections.
Progress to finer-grit sandpaper: Gradually switch to finer-grit sandpaper to achieve a smooth and polished finish.
Clean the surface: After sanding, remove any dust or debris from the surface using a vacuum cleaner or a damp cloth.
Expert Tips for Working with Drywall
In addition to the step-by-step process, here are some expert tips to make your drywall taping experience even smoother:
Proper tool maintenance: Regularly clean and maintain your taping tools to ensure optimal performance and longevity.
Avoid over-sanding: Be cautious not to sand too much, as it can weaken the joint compound and result in an uneven surface.
Use a light source: Shine a light across the surface while sanding to identify any imperfections that need to be addressed.
Keep the joint compound consistency in check: Follow the manufacturer’s instructions and maintain the right consistency of the joint compound to achieve the best results.
Feather the compound: When applying subsequent coats, feather the compound beyond the joint edges to create a seamless blend with the surrounding drywall.
Utilize a corner trowel: A corner trowel can help you achieve clean and sharp corners, saving you time and effort.
Apply pressure evenly: When embedding the tape, apply even pressure across its entire length to prevent air bubbles and ensure a secure bond.
Prevent nail pops: Use drywall screws instead of nails to minimize the risk of nail pops, which can lead to visible cracks in the future.
Address imperfections promptly: If you notice any imperfections after sanding, apply another coat of joint compound and repeat the sanding process.
Protect your work area: Cover the floor and furniture with drop cloths to prevent dust and debris from settling on them during the taping and sanding process.
With these expert tips in mind, even the most inexperienced individual can achieve professional-looking results when taping drywall.
Note: It’s important to follow local building codes and regulations when working with drywall. Additionally, consult with a building inspector to ensure you are using the appropriate materials for your specific project.
Conclusion
By following the tips and techniques shared in this comprehensive guide, you can significantly improve your drywall taping skills. From proper preparation to selecting the right materials and applying the tape and compound, each step plays a critical role in achieving a flawless finish. Remember to take your time, stay patient, and practice these techniques to become more proficient over time. With dedication and attention to detail, you’ll be able to complete your drywall projects with professional-level results.